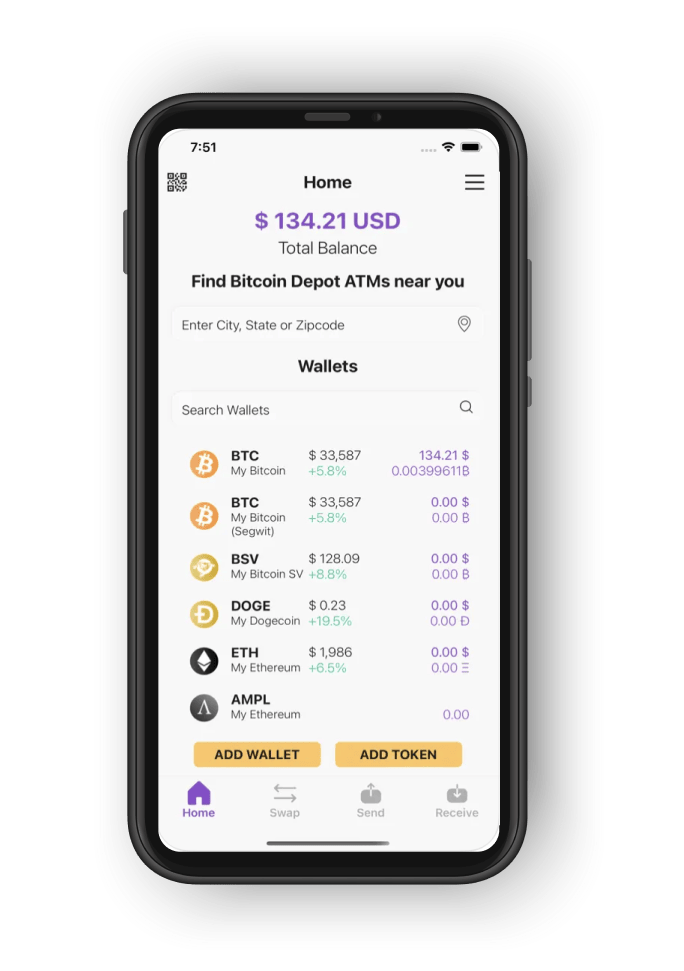
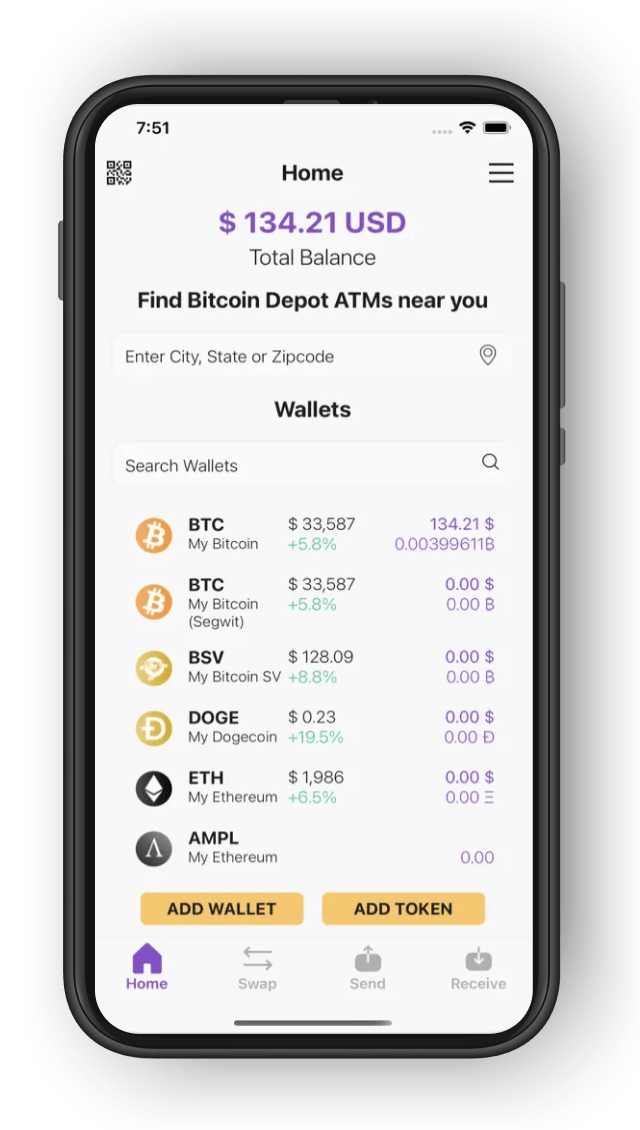
Published Feb, 17 2022

Here's What It's Like to Use a Crypto Kiosk

I first heard about Bitcoin ATMs, or "crypto kiosks", a few weeks ago, and I was very intrigued about the concept.
Bitcoin Depot

I first heard about Bitcoin ATMs, or "crypto kiosks", a few weeks ago, and I was very intrigued about the concept. After doing some research, I found there were a staggering number of these kiosks (20 of them!) within a mile of my home in Los Angeles.

Only one of the crypto machines near me is a 2-way ATM, which means you can both purchase & withdraw your bitcoin (BTC) using cash. So off I went on a journey to find this ATM, located inside of a Chevron Gas Station on Melrose, in hopes of testing it out.

Step One: Locating the Host Business

If you're familiar with the area, you'll know that this street is usually bustling with activity. The place is always busy with cars, so I knew that this one must be popular. There are a few signs near the gas pumps advertising Bitcoin ATMs as well as a poster for Bitcoin right next to the front doors. This made me feel more confident that they know what they're doing at this location and would be able to provide some help if needed.

The vast majority of these Bitcoin ATMs are located within gas stations, convenience and grocery stores, so finding and accessing the Bitcoin ATMs is usually pretty straightforward.

Step Two: Locating the Kiosk

After parking at a pump, I walked into the store and was greeted by a very friendly employee. I explained that I wanted to use their crypto ATM, to which they directed me to a bright yellow Bitcoin Depot machine next to a regular ATM. I had seen pictures of these things before and knew what they looked like, but let me tell you - seeing one up close for yourself is an entirely different experience! The machine was very sleek and high-tech looking compared to your regular everyday banking ATM.

Step Three: Purchasing Bitcoin

The kiosk was very easy to use, as I had expected. After tapping the screen to start, there were simple step-by-step instructions on how to start a transaction. In my case, I simply wanted to test a purchase and withdraw to get a feel of how the machine worked.

Select an Amount

The machine prompted me to enter the amount of bitcoin I wanted to purchase, to which I chose the $20-$250 option. Since my purchase was going to be under $250, all I had to do was provide a name and phone number to get started.

This particular Bitcoin ATM had a daily purchase limit of $15,000 and a withdrawal limit of $6,000 per transaction. 

Enter a Phone Number

I entered my phone number using the keypad and proceeded to the next screen which featured some standard Terms of Service as well as warnings to not purchase bitcoin for IRS payments, utility bills, or if someone says you are being investigated, as these are common scams.

It was nice to see these warnings prominently displayed - these machines are much easier to use and access than the traditional online methods of purchasing bitcoin, which makes them prime targets for less technically savvy users who might fall victim to those scams.

After accepting the terms, the following page asked for my first and last name in order to complete my profile. For purchases or withdrawals above $250, some additional information may be required to verify your identity.

Setting a PIN

Since this was my first time making a transaction with a Bitcoin Depot ATM, the machine prompted me to set up a 4-digit PIN code. Once you have a PIN set up, future transactions only require your phone number and PIN, similar to a traditional ATM.

Choosing a Cryptocurrency

The machine prompted me to choose one of the 3 supported cryptocurrencies I wanted to buy: Bitcoin. I chose Bitcoin for this test.

Choosing Your Wallet

After selecting Bitcoin, the machine asks where you want your coins to be sent. There were 2 options, (1) automatically scan your digital wallet's QR code, or (2) manually enter your wallet address. The kiosk has a built-in QR code scanner, so I would definitely recommend choosing this method instead of manually keying in your wallet address.

In my case, I already have a digital wallet set up, however, Bitcoin Depot has iOS and Android apps that have integrated digital wallets which will make the process easier if you are completely new to crypto.

Depositing Your Cash

Once the machine scanned my digital wallet's QR code, my wallet address was displayed on-screen. If you're anything like me, you double (and triple) check that your address is correct before making any transactions, and then you check it again 10 more times (you can never be too sure).

At this point, I inserted my $100 bill into the machine which was reflected on the display. You can see in real-time how much Bitcoin you are able to purchase depending on how much cash you have currently deposited in the kiosk. There is a minimum purchase of $20 and any transactions below $250 will incur an additional $3 fee.

Receiving Your Crypto

Since $100 worth of Bitcoin is all I intended to purchase, I tapped the "Finish" button which completed my transaction. Out popped a physical receipt showing the transaction ID, my digital wallet address, the amount of cash I deposited, how much bitcoin I received, as well as the exchange rate that was used. I enjoyed the transparency and helpfulness of the receipt.

At this point, it only took a few minutes for my digital wallet to pick up the pending transaction, and not long after there were enough confirmations to start using the Bitcoin.

Step Four: Converting Bitcoin to Cash

As I had mentioned in the beginning, I specifically set out to find a 2-way Bitcoin ATM that would let me both purchase and withdraw my Bitcoin using cash. The majority of Bitcoin machines only allow you to purchase crypto using cash, but not all allow you to convert your existing holdings into cash.

Sending Your Bitcoin to the Machine

The process for withdrawing your Bitcoin on this machine was almost identical to the process for purchasing Bitcoin but in reverse. After entering my phone number and name, I was shown the address and QR code that I needed to send my Bitcoin to that I wanted to withdraw in cash.

Getting Your Redemption Code

The one interesting thing about withdrawing Bitcoin into cash is that it's not completely instant. Since it takes time for Bitcoin to move about the blockchain through a process of "confirmations", you need to wait until at least one confirmation (usually about 20 minutes) has taken place.

For this reason, the machine gives you a "redemption code" that is printed on your receipt that can be used as proof of ownership for your cash so nobody else tries to come along and claim it before you do, which I thought was super cool!

Getting Your Cash

After 10-15 minutes, the Bitcoin I sent to the machine had one confirmation on the blockchain, which was all that's needed to complete the transaction and get my cash from the machine. I went back to the Bitcoin ATM and entered the redemption code from my receipt to get my cash.

Even though it takes about 20 minutes to complete the entire transaction, this is still much faster than the time it takes to transfer Bitcoin to your bank account, which can take 3-7 days in some situations.

Thoughts On My First Bitcoin ATM Transaction

I thought this process was really easy - especially considering how hard buying cryptocurrency online has been up until now. It's definitely faster than going through an exchange or going through the standard KYC identifty verification checks of other crypto apps (which is what I've done before). And even though the support is supposed to be handled by the Bitcoin ATM vendor, the Chevron employees were super helpful throughout the entire process too.

For smaller transactions and those with less access to traditional banking methods to buy Bitcoin, these kiosks are a great solution to help increase the overall adoption of cryptocurrencies which is a major plus for me.